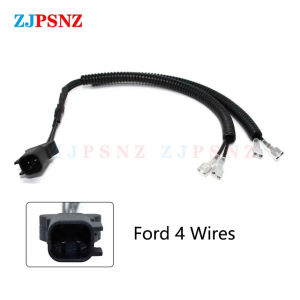
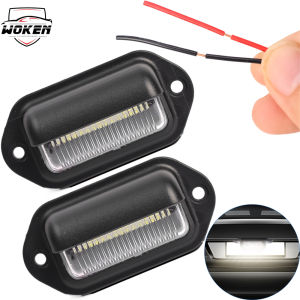
Car Horn Plug 4Wire Dedicated Snail Horn Male Socket Conversion Plug Auto Speakers Single Horn Refit Double Horn Corrugated Tube
Car Horn Plug 4Wire Dedicated Snail Horn Male Socket Conversion Plug Auto Speakers Single Horn Refit Double Horn Corrugated Tube
Introduction
Car horn plug conversion is an essential process for auto enthusiasts who want to upgrade their vehicle's sound system. This guide will walk you through the steps required to refit your car with a 4-wire snail horn socket, install a double horn corrugated tube, and convert your single horn male socket. We'll cover everything you need to know about these components, including compatibility, installation, and best practices.
What is a 4-Wire Snail Horn Socket?
A 4-wire snail horn socket is a specialized connector used for connecting car horns to the vehicle's electrical system. It consists of four wires, each responsible for different functions, such as ground, power, and signal. Understanding the functionality of a 4-wire snail horn socket is crucial for proper installation.
- Ground wire: Provides a return path for electrical current
- Power wire: Supplies power to the horn
- Signal wire: Activates the horn when the driver presses the button
- Spare wire: Often used for additional features, such as a backup alarm
Identifying Compatible Vehicles
Before installing a 4-wire snail horn socket, ensure your vehicle is compatible. Consult your vehicle's owner manual or contact the manufacturer for specific information. In general, most modern vehicles support this type of socket.
Installing the 4-Wire Snail Horn Socket
Installing a 4-wire snail horn socket involves connecting the wires to the appropriate terminals on the horn and the vehicle's electrical system. Follow these steps for a successful installation:
- Disconnect the negative battery terminal to prevent any electrical hazards.
- Locate the existing horn socket and remove it.
- Connect the ground wire to the chassis or another suitable ground point.
- Connect the power wire to the positive terminal of the vehicle's electrical system.
- Connect the signal wire to the horn button or switch.
- Connect the spare wire to any additional features, if applicable.
- Reconnect the negative battery terminal.
- Test the installation by pressing the horn button.
Double Horn Corrugated Tube Installation
A double horn corrugated tube is a component used to connect two horns together, allowing them to sound simultaneously. This section will guide you through the installation process.
Preparing the Vehicle for Installation
Before installing the double horn corrugated tube, ensure your vehicle is compatible and has the necessary components, such as two horns and a 4-wire snail horn socket. Consult your vehicle's owner manual or contact the manufacturer for specific information.
Installing the Double Horn Corrugated Tube
Installing a double horn corrugated tube involves connecting the horns together and ensuring proper alignment. Follow these steps for a successful installation:
- Disconnect the negative battery terminal to prevent any electrical hazards.
- Locate the existing horn sockets and remove them.
- Connect the horns together using the double horn corrugated tube.
- Install the 4-wire snail horn socket on the newly connected horns.
- Reconnect the negative battery terminal.
- Test the installation by pressing the horn button.
Single Horn Male Socket Conversion
A single horn male socket is a connector used for connecting a single horn to the vehicle's electrical system. This section will guide you through the conversion process.
Understanding the Single Horn Male Socket
A single horn male socket consists of two wires: ground and power. Understanding the functionality of a single horn male socket is crucial for proper installation.
- Ground wire: Provides a return path for electrical current
- Power wire: Supplies power to the horn
Installing the Single Horn Male Socket
Installing a single horn male socket involves connecting the wires to the appropriate terminals on the horn and the vehicle's electrical system. Follow these steps for a successful installation:
- Disconnect the negative battery terminal to prevent any electrical hazards.
- Locate the existing horn socket and remove it.
- Connect the ground wire to the chassis or another suitable ground point.
- Connect the power wire to the positive terminal of the vehicle's electrical system.
- Reconnect the negative battery terminal.
- Test the installation by pressing the horn button.
Car Horn Plug Conversion Best Practices
Car horn plug conversion requires careful planning and execution to ensure compatibility with existing systems and proper installation. Follow these best practices to achieve a successful conversion:
- Ensure compatibility with existing systems: Consult your vehicle's owner manual or contact the manufacturer for specific information.
- Follow manufacturer guidelines: Adhere to the manufacturer's instructions for installation and testing.
- Test the installation: Verify proper operation by pressing the horn button and listening for the expected sound.
By following these guidelines, you can successfully convert your car horn plug and enjoy a more powerful and distinctive sound from your vehicle's horn system.

GlobalLifestyle
You May Also Like
Super Bright LED Car Headlights 24V 12V High Beam Truck Reverse Light Excavator Forklift Lens Bulb Ultra-Light Auto Lighting System

Surfy Motorcycle Mini Driving Light V2+ 20W/Bulb 3000LM With Cooling System

YAMAHA MIO i125 FULL DECALS / STICKER FOR MOTORCYCLE PARTS AND ACCESSORIES
Kawasaki Ninja ZX-25R 51MM Exhaust Elbow Full Systems Front Middle Link Pipe Muffl

Car Leather Seat Maintenance Care Cream Multifunctional Polishing Stain Removal Leather Renovation Sofa Cleaning 160g

Butterfly Car Universal Air Filter Housing Clip Air Filter Fixing Hook Buckle Paddle Wrench Air Inlet Steel Clip Spring Clip Hook
CPO FORD RANGER T9 2023+ (WILDTRAK) FENDER FLARE (10895)
WOKEN 2PCS 6 LED Car License Plate Light: A Comprehensive Guide
Full Metal Car Phone Navigation Mount Accessories: 17mm Ball Head Universal Truck Mount Phone Holder Base

Full of Vitality Paper Cover Car Tissue Box Cute Panda Red Fabric Hanging Car Tissue Bag Buggy Bag

Car Carbon Fiber & Anti-Collision Stickers: Enhance Your Vehicle's Aesthetics & Safety