


Flush Offset Toilet Flange & Connector Extender: A Comprehensive Guide
Flush Offset Toilet Flange & Connector Extender: A Comprehensive Guide
Understanding Flush Offset Toilet Flange
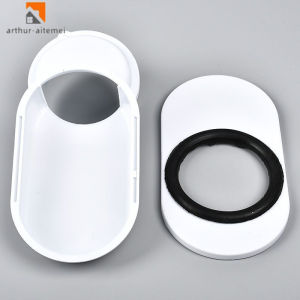
The flush offset toilet flange is a versatile component designed to correct placement issues with toilets, urinals, and other bathroom fixtures. It enables installers to form a clean cavity in a concrete slab and easily connect to the drain system. This comprehensive guide will provide insights into the material, durability, adjustment distance, and features of flush offset toilet flanges.
Material & Durability
Flush offset toilet flanges are typically made of PVC material, which is known for its durability and reusability. The 3mm thickness pipe wall ensures added strength and resistance against cracking. These flanges are designed to withstand gravity pressure, making them ideal for various bathroom installations.
Adjustment Distance & Features
The adjustment distance of the upper and lower ports of the flush offset toilet flange ranges from 5cm to 10cm (1.97 inches to 3.94 inches). This flexibility allows installers to correct placement issues, such as toilets being too far, too close, or off-center from the wall. Additionally, the flush offset toilet flange enables easy connection to the drain system, providing a clean and efficient installation process.
Installation Process
Installing a flush offset toilet flange involves several steps, including preparation, connecting to the drain system, and replacing or repairing toilet components. This section will guide you through the process, ensuring a smooth and successful installation.
Preparation Steps
Before installing the flush offset toilet flange, it is essential to gather the necessary tools and materials. These include a wrench, pliers, a level, and a bucket. Once you have these items, follow these steps:
- Turn off the water supply to the toilet.
- Remove the old toilet flange, if applicable.
- Clean the area around the flange to ensure a smooth installation process.
- Check the alignment of the flange using a level.
Connecting to Drain System
Once the preparation steps are complete, it is time to connect the flush offset toilet flange to the drain system. Follow these steps:
- Insert the flange into the hole in the floor.
- Secure the flange using the appropriate fasteners.
- Connect the toilet to the flange, ensuring proper alignment.
- Reconnect the water supply and test the installation.
Replacing & Repairing Toilet Components
In some cases, it may be necessary to replace or repair toilet components, such as urinals and repair parts. This section will provide guidance on quick, economical, and clean installation processes for tub waste and drain repairs.
Quick & Economical Installation
Replacing or repairing toilet components can be a time-consuming process, but with the flush offset toilet flange, it becomes quick and economical. Follow these steps:
- Identify the component that needs replacement or repair.
- Gather the necessary tools and materials.
- Remove the old component, if applicable.
- Install the new component using the flush offset toilet flange.
Repairing Parts & Urinals
When repairing parts or urinals, it is essential to choose the right materials and tools. The flush offset toilet flange offers a universal solution for various bathroom installations. Follow these steps:
- Identify the issue with the part or urinal.
- Gather the necessary tools and materials.
- Remove the damaged part or urinal, if applicable.
- Install the new part or urinal using the flush offset toilet flange.
By following these guidelines, you can ensure a successful installation and repair process for your flush offset toilet flange. Remember to use the appropriate keywords, such as 'flush offset toilet flange,' 'connector extender,' 'universal flange,' 'toilet flange replacement,' and 'drain repairing adapter,' to optimize your content for search engines.

Arthur Aitemei
Review
You May Also Like

NSS 100W & 150W Solar Panels: A Comprehensive Guide
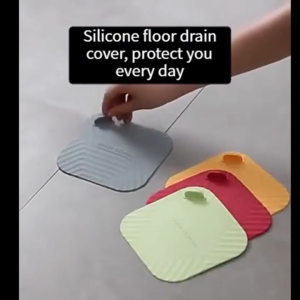
Anti Odor Floor Drain Cover Thicken Silicone Universal Kitchen Bathroom Floor Drain Cover Sink Water Stopper
Karcher K2/K3/K4 Pressure Washers High Pressure Washer Hose Car Wash Water Cleaning Extension Hose
10Pcs M6-M8 Thread Insert Outside Thread Adapter Screw Insert Sleeve Converter Nut Coupler
Metal Wall Bracket For Angle Grinder Storage FeaturE Cable Management Hooks And Mounting Hardware For Garage Shelving

FNIRSI HS-02 100W PD Touch-up Station: A Comprehensive Guide
Efficient Sharpener Electric Grinding Tool for Professional DIY Use Home Workshop Restoring Sharpness Quickly

DAVU 10 in 1 SET screwdriver tool Insulated Screw Driver Bit Magnetic Slotted Screwdrivers Holder-Z585
Multipurpose Adjustable Clip Faucet Adapter Convenient Designs Accessory for 15mm To 23mm Hose Pipe Connection Use
Cabinet Door Installation Tool - 2-in-1 Adjustable Mounting Jig with Positioner and 1 Drill Bits
SENBERCEN 1.5HP Heavy-Duty Submersible Pump: A Comprehensive Guide


