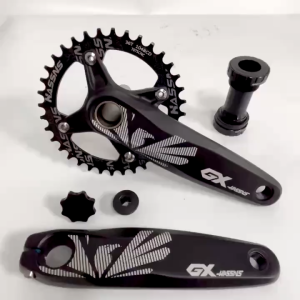



Goldix 3mm Offset Chainring: A Comprehensive Guide
Goldix 3mm Offset Chainring: A Comprehensive Guide
Introduction to Goldix 3mm Offset Chainring
The Goldix 3mm Offset Chainring is a high-quality, CNC hollow aluminum chainring designed for SRAM ETAP AXS and KRAFT RED 8 NAIL systems. This chainring features a 36T or 38T sprocket size, making it suitable for various mountain biking applications. In this guide, we will explore the key features, installation process, performance benefits, and maintenance tips for this versatile chainring.
Overview of Goldix Chainring
Goldix is a renowned brand known for producing high-performance cycling components. Their 3mm offset chainring is crafted from 7075 aluminum, providing excellent strength-to-weight ratio and durability. This chainring is designed to enhance efficiency, power transfer, and chain stability, making it a popular choice among mountain bikers.
Key Features of Goldix Chainring
The Goldix 3mm offset chainring boasts several notable features:
- CNC hollow aluminum construction
- 36T or 38T sprocket size
- 8-bolt mounting system
- Narrow-wide tooth profile for improved chain retention
- Lightweight and durable design
Compatibility with SRAM ETAP AXS & KRAFT RED 8 NAIL
The Goldix 3mm offset chainring is compatible with both SRAM ETAP AXS and KRAFT RED 8 NAIL systems, ensuring seamless integration with popular mountain bike drivetrains.
How to Install Goldix 3mm Offset Chainring
Installing the Goldix 3mm offset chainring is a straightforward process, provided you have the necessary tools and follow the steps outlined below.
Preparing for Installation
Before installing the chainring, gather the following tools:
- Chainring bolts
- Torque wrench (set to 8 Nm)
- Chainring removal tool
- Bike stand (optional)
Step-by-Step Installation Process
- Remove the chain from the existing chainring.
- Use the chainring removal tool to remove the old chainring.
- Clean the crankset and chainring bolts to ensure proper installation.
- Position the Goldix 3mm offset chainring onto the crankset.
- Install the chainring bolts and tighten them to 8 Nm using a torque wrench.
- Reinstall the chain and test the chainring for proper operation.
Tips for a Smooth Installation
- Ensure the chainring is properly aligned with the crankset before tightening the bolts.
- Tighten the bolts in a star pattern to avoid uneven tension.
- Check the chainring for proper operation after installation.
Performance & Benefits of Goldix 3mm Offset Chainring
The Goldix 3mm offset chainring offers several performance benefits, including enhanced efficiency, improved chain stability, and weight reduction.
Enhanced Efficiency & Power Transfer
The narrow-wide tooth profile of the Goldix chainring provides better chain retention, reducing chain slap and improving power transfer. This results in smoother pedaling and improved overall efficiency.
Improved Chain Stability & Reliability
The 3mm offset design helps maintain proper chain alignment, reducing wear on the chain and sprockets. This leads to improved reliability and extended component lifespan.
Weight Reduction & Durability
Crafted from 7075 aluminum, the Goldix 3mm offset chainring is lightweight yet durable. This makes it an ideal choice for mountain bikers looking to reduce weight without compromising on strength.
Maintenance & Troubleshooting
Regular maintenance is essential to ensure optimal performance and longevity of the Goldix 3mm offset chainring. Follow these tips for proper care:
Regular Maintenance Tips
- Clean the chainring and drivetrain regularly to remove dirt and debris.
- Inspect the chainring for signs of wear or damage.
- Check chainring bolts for proper tightness.
Common Issues & Solutions
- Chain slap: Adjust chain tension or upgrade to a chain guide.
- Worn chainring teeth: Replace the chainring if teeth are excessively worn.
- Loose chainring bolts: Tighten bolts to 8 Nm using a torque wrench.
Long-Term Care & Preservation
- Store the bike in a dry, cool place to prevent rust and corrosion.
- Regularly inspect the chainring for signs of wear or damage.
- Replace the chainring if it shows excessive wear or damage.

GlobalTechMart
Review
You May Also Like

PGM Golf Double Side Putter 2 Way Chipper Beginner Putter TUG070
Sit-Ups Assistant Device: Durable Waist Abdomen Machine & Home Gym Fitness Equipment

SUKE Sports Ice Cool Towel: A Versatile Sports Accessory
Rear Fender Bracket Taillight for Kukirin G2 Pro 2024 Version Electric Scooter Rear Mudguard Fixing Arm Kickscooter Accessories

Ultra-Lightweight Four-Season Envelope Style Camping Sleeping Bag Portable for Adults Single And Double Universal Winter Proof
(BUY 1 TAKE 1)1500W Solar Lighting Outdoor Portable Solar Lights Magnetically Absorbed Indoor Type-C Fast Charge Home Emergency Camping Lighting for Construction Sites Campin
Hunthouse Artist Minnow Fishing Lure 70mm 7g Sea Fishing Hard Sinking Baits Jerkbait Wobblers Twitch Action For Trout Bass LW401
2pcs Reflective Safety Nylons Strap Regulable Elastics Leg Strap Bike Cycling Tie for Night Cycling and Running

900ml Cute Large Capacity Straw Cup Outdoor Portable Straw Cup Dopamine Water Bottle With Handle
Ankle Support Brace Breathable Adjustable Ankle Brace with Side Stabilizers for Men Women Sports Ankle Protection Volleyball Basketball
Super Loud Survival Whistle Outdoor Treble Whistles for Life Referee Sports Teacher Special Coach Training Professional Whistle