GEELY EX5 e5: Interior Accessory Upgrades & Protection
GEELY EX5 e5: Interior Accessory Upgrades & Protection
Interior accessory upgrades can significantly enhance the functionality and appearance of your GEELY EX5 e5. This comprehensive guide will walk you through the process of upgrading and protecting your vehicle's interior, focusing on steering wheel buttons, adhesive stickers, rubber strippers, and wiper buttons.
What Are Interior Accessory Upgrades?
Interior accessory upgrades refer to the installation of new components or enhancements to existing features within your car's cabin. These upgrades can improve both the functionality and aesthetics of your vehicle. In this guide, we will explore steering wheel button upgrades, adhesive stickers for interior protection, and rubber strippers for car interiors.
Understanding Steering Wheel Button Upgrades
Steering wheel button upgrades involve replacing or modifying the buttons on your GEELY EX5 e5's steering wheel. This can include changing the appearance of the buttons, enhancing their functionality, or improving their durability. Upgrading your steering wheel buttons can provide a more personalized driving experience and make it easier to control various functions while keeping your hands on the wheel.
Adhesive Stickers for Interior Protection
Adhesive stickers are a popular choice for protecting your GEELY EX5 e5's interior from wear and tear. These stickers can be applied to various surfaces, such as the steering wheel, dashboard, and door panels, to prevent scratches, scuffs, and other damage. Adhesive stickers come in various materials, including vinyl, rubber, and plastic, allowing you to choose the best option for your vehicle.
Rubber Strippers for Car Interiors
Rubber strippers are another effective way to protect your GEELY EX5 e5's interior. These strips can be installed along the edges of door panels, seat cushions, and other surfaces to prevent damage from items entering or exiting the vehicle. Rubber strippers are available in various colors and styles, making it easy to find a design that complements your car's interior.
How to Install Adhesive Interior Protection
Installing adhesive interior protection is a straightforward process that can be completed in just a few steps. Here's how to apply adhesive stickers to your GEELY EX5 e5:
Preparing Your GEELY EX5 e5
Before applying any adhesive stickers, make sure your vehicle's interior is clean and free of dust, dirt, and debris. This will help ensure a strong bond between the sticker and the surface it's being applied to.
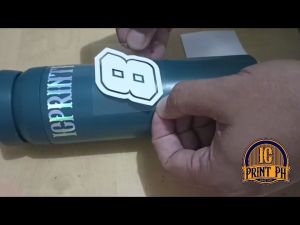
Applying Adhesive Stickers
To apply adhesive stickers, start by peeling off the backing paper. Align the sticker with the desired surface and press it firmly into place. Work from one edge to the other, smoothing out any bubbles or wrinkles as you go.
Finishing Touches
Once the adhesive sticker is in place, use a squeegee or credit card to press it firmly against the surface. This will help remove any remaining air bubbles and ensure a secure bond. Finally, trim any excess material using a sharp utility knife or scissors.
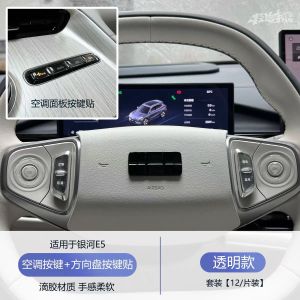
GEELY EX5 e5 Steering Wheel Stickers
Steering wheel stickers can add a personal touch to your GEELY EX5 e5's interior while providing protection from wear and tear. Here's what you need to know about choosing and installing steering wheel stickers:
Choosing the Right Stickers
When selecting steering wheel stickers for your GEELY EX5 e5, consider factors such as design, material, and durability. Look for stickers that are easy to install and provide a good level of protection against scratches and scuffs.
Installing Steering Wheel Stickers
To install steering wheel stickers, start by cleaning the surface of your steering wheel. Peel off the backing paper and align the sticker with the desired location. Press the sticker firmly into place, working from one edge to the other.
Maintaining Your New Stickers
To keep your steering wheel stickers looking their best, avoid using harsh chemicals or abrasive materials when cleaning your vehicle's interior. Instead, use a mild soap and water solution to gently clean the surface.
Wiper Button Upgrades
Wiper button upgrades can enhance the functionality and appearance of your GEELY EX5 e5's wiper system. Here's what you need to know about exploring wiper button options and installing new buttons:
Exploring Wiper Button Options
When choosing wiper button upgrades for your GEELY EX5 e5, consider factors such as design, material, and functionality. Look for buttons that are easy to install and provide a good level of protection against wear and tear.
Installing New Wiper Buttons
To install new wiper buttons, start by removing the existing buttons from your GEELY EX5 e5. Follow the manufacturer's instructions for installing the new buttons, making sure they are securely attached and functioning properly.
Testing Your Upgrades
Once your new wiper buttons are installed, test them to ensure they are working correctly. This will help you identify any issues early on and make any necessary adjustments.
Conclusion
Interior accessory upgrades can significantly enhance the functionality and appearance of your GEELY EX5 e5. By upgrading your steering wheel buttons, applying adhesive stickers for interior protection, installing rubber strippers, and exploring wiper button options, you can personalize your vehicle's interior and keep it looking its best. With this comprehensive guide, you'll be well-equipped to tackle any interior upgrade project with confidence." }

Crazy Runner
Review

You May Also Like
Genuine High Quality Engine Oil Dipstick Fit For Mazda 3 M3 1.6l *57
YAMAHA Kanji Cutout Vinyl Sticker / Decal Waterproof

The Wonderlube Additive Oil (2pcs 250ml) for Gas & Diesel Car Engine Protector Fuel-Saving Lube Additive Engine Oil
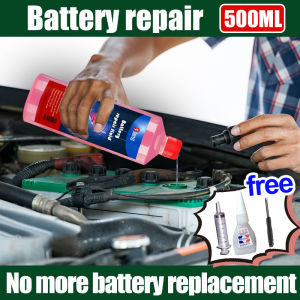
KDC Battery Repair Solution: 99% Efficiency & Longevity
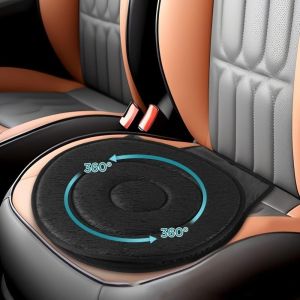
YIYIUR 360 Degree Rotating Rotating Car Seat Cushion Anti-slip Breathable Car Seat Pad Adjustable Movable Seat Cushions
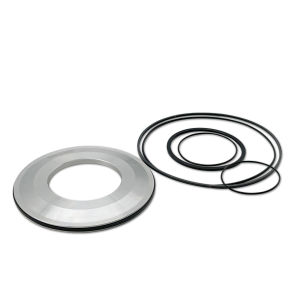
TRANSPEED RE0F11A JF015E JATCO CVT Transmission sprocket / master cylinder / steel pulley Rebuild Kit Seal Oil Ring Repair Kit primary pulley piston kit for Nissan Tiida 1.6L Mitsubishi suzuki car accessories
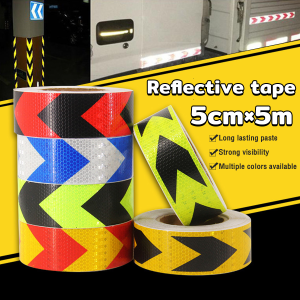
Jozoo & Digeo Reflective Safety Tape: Enhancing Vehicle Visibility
Honda Beat FI Version 2 V2 Combi Brake: A Comprehensive Guide

12V Car & Motorcycle Battery Charger – Fully Automatic Smart Chip Pulse Repair Function LCD Display

Applicable to Honda Gold Wing GL1800 2018-2024 Annual Model Instrument Film Wear-Resistant and Scratch-Resistant Ultra-clear protector
Motorcycle Front Damping Oil Seal Dust Cover for Tianyin TT150 Motorcycle Shock Absorber Seal Prevents Oil Leaks And Dust