
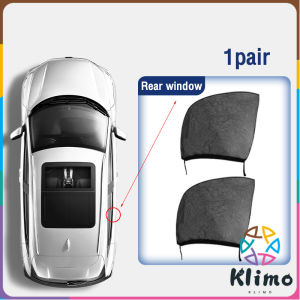
Klimo Car Window Sunshade Mesh Car Mosquito Net Screen 1Pair Visor Mesh Breathable Anti-UV

Klimo Car Window Sunshade Mesh Car Mosquito Net Screen 1Pair Visor Mesh Breathable Anti-UV

Features: Please actually measure the window size before purchasing. The high-elastic fabric is suitable for more than 90 of cars, small SUVs and other models. Easy to install. Keep car parts protected from sunlight, non-fading, heat-resistant materials, and light weight. Practical type, sunshade during the day, mosquito proof at night. Helps block ultraviolet rays, lower internal temperature, and prevent bright light and burns for passengers in the vehicle

Klimo
Seller ratings 97%
Review

Oops
This video has no reviews.
You May Also Like
00:43
Universal Three-in-One Motorcycle Helmet Summer Safety Cap Electric Car Hat for Men And Women Electric Motorcycle Accessory

00:10
COD 1 Set (Left & Right) CT100/TMX-155 Handle Switch With Brake Lever For Ordinary Motorcycle Accessories

00:21
YAMAHA NMAX 155 V3 TURBO HEAVY DUTY CRASHGUARD FOR SALE POWER COATED

00:36
Ultimate Guide to the Universal 12V Alarm System & Remote Control Anti-theft

00:24
Vacuum Switching Valve & Vapor Canister Purge Valve OEM K5T48280 MR212636 for Mitsubishi Legnum VR4\\n\\n What is the Vacuum Switching Valve & Vapor Canister Purge Valve?\\n\\nThe Vacuum Switching Valve and Vapor Canister Purge Valve are crucial components in the emission control system of Mitsubishi Legnum VR4 vehicles. These valves work together to regulate the flow of fuel vapor from the fuel tank to the engine intake manifold, reducing harmful emissions and improving overall vehicle performance.\\n\\n Key Features & Specifications\\n\\n- **Model**: Lancer\\n- **Engine**: 1.5 12V, 1.6 16V, 1.8, 1.5, 1.6 16V 4WD, 2.4 GDI, 1.8 4WD, 1.2, 1.8 Diesel, 1.8 4WD, 1.5, 2.0L 1997cc, 2.0L 1997cc w/Turbo, 2.0L 1997cc wo/Turbo\\n- **Year**: 2005-2006, 1986-1988, 1995-2003, 1992-1996, 1985-1987, 1990-1991, 1987-1989\\n- **OE NO.**: Vacuum Switching Valve Vapor Canister Purge Valve K5T48280 MR212636 K5T48280 K005T48280 MR-212636\\n- **Car Fitment**: MITSUBISHI\\n- **Size**: OEM Standard, OEM Size\\n- **Warranty**: 1 Year, 12 Months\\n- **Place of Origin**: Guangdong, China\\n- **Brand Name**: Longyao\\n\\n Benefits of Using the OEM K5T48280 & MR212636\\n\\nUsing the OEM K5T48280 and MR212636 Vacuum Switching Valve and Vapor Canister Purge Valve offers several advantages:\\n\\n- **High-Quality Construction**: Made from durable materials, these valves are designed to withstand the harsh conditions inside your vehicle's engine bay.\\n- **Improved Performance**: By regulating fuel vapor flow, these valves help maintain optimal engine performance and reduce harmful emissions.\\n- **Easy Installation**: Designed to fit seamlessly into your Mitsubishi Legnum VR4, these valves require minimal installation effort.\\n- **Long-Term Reliability**: With a one-year warranty, you can trust that these valves will provide reliable service for years to come.\\n\\n How to Replace/Repair the Vacuum Switching Valve & Vapor Canister Purge Valve\\n\\nReplacing or repairing the Vacuum Switching Valve and Vapor Canister Purge Valve in your Mitsubishi Legnum VR4 is a straightforward process. Follow these steps to ensure a successful installation:\\n\\n Step-by-Step Guide for Installation\\n\\n1. **Disconnect the Battery**: Before beginning any repair or replacement, disconnect the battery to prevent electrical shorts.\\n2. **Locate the Valves**: Identify the location of the Vacuum Switching Valve and Vapor Canister Purge Valve in your vehicle's engine bay.\\n3. **Remove the Old Valves**: Carefully remove the old valves, taking note of their orientation and any connecting hoses or wires.\\n4. **Install the New Valves**: Install the new OEM K5T48280 and MR212636 Vacuum Switching Valve and Vapor Canister Purge Valve, ensuring they are properly aligned and securely fastened.\\n5. **Reconnect the Battery**: Once the valves are installed, reconnect the battery and test the vehicle to ensure proper operation.\\n\\n Troubleshooting Common Issues\\n\\nIf you encounter any issues during installation or after replacing the Vacuum Switching Valve and Vapor Canister Purge Valve, refer to the following troubleshooting tips:\\n\\n- **Check Connections**: Ensure all connections, including hoses and wires, are properly connected and secure.\\n- **Verify Orientation**: Double-check the orientation of the valves to ensure they are installed correctly.\\n- **Test for Leaks**: Check for any leaks in the system, which may cause improper operation of the valves.\\n\\n Where to Buy the OEM K5T48280 & MR212636 Vacuum Switching Valve & Vapor Canister Purge Valve\\n\\nIf you're looking to purchase the OEM K5T48280 and MR212636 Vacuum Switching Valve and Vapor Canister Purge Valve for your Mitsubishi Legnum VR4, Longyao is the brand to trust. Longyao is known for providing high-quality, reliable parts at competitive prices.\\n\\n Longyao Brand & Warranty Information\\n\\nLongyao offers a one-year warranty on their Vacuum Switching Valve and Vapor Canister Purge Valve products, giving you peace of mind knowing that your investment is protected.\\n\\n Place of Origin & Compatibility with Mitsubishi Legnum VR4 Models\\n\\nThese valves are manufactured in Guangdong, China, and are compatible with various Mitsubishi Legnum VR4 models, including the Lancer Evolution and other variants listed in the specifications above.\\n\\nBy choosing the OEM K5T48280 and MR212636 Vacuum Switching Valve and Vapor Canister Purge Valve from Longyao, you can enjoy improved performance, reduced emissions, and long-term reliability for your Mitsubishi Legnum VR4.\n}

00:49
FRONT HOOD LIFT SUPPORT STRUTS FOR VOLKSWAGEN GOLF 7 (2013-2020)

00:12
Valve Guide for Wave 125

00:55
Honda Click 125/150 V2 V3 Tail Light RGB Smoke Lens 13 Modes LED Motorcycle VIVID Color Spotlights Plug And Play

00:23
1 Pair Blind Spot Mirror Rectangle Adjustable Car Auxiliary Wide Angle Mirror for Universal Cars

00:40
Customizable Car Trunk Storage Box Net Pocket Automobile Rear Seat Organizer Bag Simple Style Fabric Material for Toyota Hanlan

00:18
1 Pair Car Battery Terminals Quick Disconnect Auto Cables Connectors Wire Cable Shut-Off Connectors for Car Auto Accessories\\n\\n Understanding Car Battery Terminals & Quick Disconnect Cables\\n\\nAutomotive electrical components are essential parts of any vehicle, providing power to various systems and accessories. One of the most critical components is the car battery, which supplies electrical energy to the vehicle's ignition system, lighting, and other accessories. Car battery terminals are the connection points that allow power to flow from the battery to the rest of the vehicle. Quick disconnect cables, on the other hand, provide a convenient way to connect and disconnect these terminals, making it easier to work on the battery or replace it if necessary.\\n\\n What Are Automotive Electrical Components?\\n\\nAutomotive electrical components include various parts that make up a vehicle's electrical system, such as the battery, alternator, starter motor, fuses, relays, and wiring harnesses. These components work together to provide power to the vehicle's systems and accessories, ensuring proper functioning and safety.\\n\\n Key Features of Auto Accessories Connectors\\n\\nAuto accessories connectors, such as quick disconnect cables, have several features that make them ideal for use in automotive applications. These include:\\n\\n- **Durability:** Made from high-quality materials that can withstand harsh environmental conditions and frequent use.\\n- **Ease of installation:** Designed for easy connection and disconnection, allowing users to quickly access the battery or other electrical components.\\n- **Safety:** Incorporate safety features, such as insulated terminals and protective covers, to prevent accidental short circuits or electrical shocks.\\n- **Compatibility:** Available in various sizes and configurations to fit different types of vehicles and electrical systems.\\n\\n Benefits of Quick Disconnect Cables\\n\\nQuick disconnect cables offer several advantages over traditional wiring methods, including:\\n\\n- **Convenience:** Allow users to easily connect and disconnect electrical components without the need for tools or soldering.\\n- **Flexibility:** Can be used for a wide range of applications, from connecting battery terminals to powering accessories like winches or inverters.\\n- **Reliability:** Provide a secure connection that resists vibration and corrosion, ensuring consistent performance over time.\\n\\n Choosing the Right Quick Disconnect Cable Connectors\\n\\nSelecting the appropriate quick disconnect cable connectors for your car battery terminals requires careful consideration of several factors, including compatibility, quality, and price.\\n\\n Factors to Consider When Selecting Connectors\\n\\nWhen choosing quick disconnect cable connectors, consider the following factors:\\n\\n- **Compatibility:** Ensure the connectors are compatible with your vehicle's battery terminals and electrical system.\\n- **Quality:** Look for connectors made from high-quality materials that can withstand harsh environmental conditions and frequent use.\\n- **Price:** Compare prices and durability of different connectors to find the best value for your needs.\\n\\n Popular Brands & Models of Quick Disconnect Cables\\n\\nSeveral brands offer quick disconnect cable connectors suitable for car battery terminals, including:\\n\\n- **Weldpro:** Known for their high-quality, durable connectors that provide a secure connection.\\n- **Panduit:** Offers a wide range of connectors suitable for various automotive applications.\\n- **TE Connectivity:** Provides reliable, corrosion-resistant connectors designed for harsh environmental conditions.\\n\\n Comparing Prices & Durability of Different Connectors\\n\\nWhen comparing quick disconnect cable connectors, consider both price and durability to find the best value for your needs. While some connectors may be more expensive upfront, they may offer better long-term performance and lower maintenance costs.\\n\\n Installing & Maintaining Your Quick Disconnect Cable Connectors\\n\\nProper installation and maintenance of quick disconnect cable connectors are essential for ensuring reliable performance and safety.\\n\\n Step-by-Step Guide to Installing Connectors\\n\\nFollow these steps to install quick disconnect cable connectors:\\n\\n1. **Disconnect the battery:** Before installing the connectors, disconnect the battery to prevent electrical shock or short circuits.\\n2. **Prepare the cables:** Strip the ends of the cables and clean them to ensure a secure connection.\\n3. **Install the connectors:** Attach the connectors to the battery terminals and cables, ensuring a secure fit.\\n4. **Reconnect the battery:** Once the connectors are installed, reconnect the battery and test the system to ensure proper functioning.\\n\\n Tips for Proper Maintenance & Troubleshooting\\n\\nTo maintain the performance and safety of your quick disconnect cable connectors, follow these tips:\\n\\n- **Inspect regularly:** Check the connectors for signs of wear, corrosion, or damage, and replace them if necessary.\\n- **Clean connections:** Keep the connectors clean and free from dirt, grime, or corrosion to ensure a secure connection.\\n- **Lubricate terminals:** Apply a small amount of dielectric grease to the terminals to protect them from corrosion and ensure a reliable connection.\\n\\n Common Issues & Solutions for Quick Disconnect Cables\\n\\nSome common issues with quick disconnect cable connectors include loose connections, corrosion, and damage. To address these issues, follow these solutions:\\n\\n- **Loose connections:** Tighten the connectors to ensure a secure fit.\\n- **Corrosion:** Clean the connectors and apply dielectric grease to protect them from further corrosion.\\n- **Damage:** Replace damaged connectors with new ones to ensure proper functioning and safety.\\n\\nBy understanding car battery terminals and quick disconnect cables, choosing the right connectors, and properly installing and maintaining them, you can ensure reliable performance and safety for your vehicle's electrical system.\n}

00:24