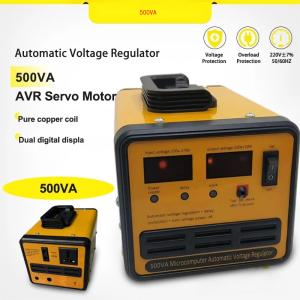
AVR Automatic Voltage Regulator 2000W/220V SVR-2000VA/1500VA/1000VA/500VA Servo Type AVR Time Delay
AVR Automatic Voltage Regulator 2000W/220V SVR-2000VA/1500VA/1000VA/500VA Servo Type AVR Time Delay
Understanding the SVR-2000VA Voltage Stabilizer
The SVR-2000VA Voltage Stabilizer is a top-of-the-line Automatic Voltage Regulator (AVR) designed to maintain stable voltage levels for various devices. This robust stabilizer comes in four different models – SVR-2000VA, SVR-1500VA, SVR-1000VA, and SVR-500VA – catering to different power requirements.
Key Features of the SVR-2000VA
The SVR-2000VA Voltage Stabilizer boasts several features that make it stand out from other voltage regulators:
- Servo Type: The servo type mechanism ensures precise voltage regulation and quick response time.
- Wide Input Range: With a wide input range of 120V to 280V, this stabilizer can handle fluctuating voltage levels.
- Overload Protection: The built-in overload protection safeguards connected devices from damage due to excessive current draw.
Multiple Output Voltages Explained
One of the most notable features of the SVR-2000VA Voltage Stabilizer is its ability to provide multiple output voltages. This flexibility allows users to connect devices with varying voltage requirements, making it an ideal choice for households, offices, and industrial applications.
Benefits of the Servo Type AVR
The servo type AVR offers several advantages over traditional AVRs:
- Improved Response Time: The servo type mechanism ensures faster voltage regulation, minimizing the risk of device damage due to voltage fluctuations.
- Higher Accuracy: With a tighter tolerance level, the servo type AVR provides more accurate voltage regulation, ensuring optimal performance of connected devices.
Setting Up the SVR-2000VA Voltage Stabilizer
To ensure proper installation and operation of the SVR-2000VA Voltage Stabilizer, follow these steps:
Step-by-Step Installation Process
- Choose a suitable location for the stabilizer, ensuring it is away from heat sources and flammable materials.
- Connect the stabilizer to the main power supply using the appropriate cables.
- Connect the devices to the stabilizer using the designated output sockets.
- Turn on the power supply and monitor the voltage levels on the display screen.
Configuring Multiple Output Voltages
To configure multiple output voltages, follow these steps:
- Locate the voltage adjustment knob on the front panel of the stabilizer.
- Rotate the knob clockwise or counterclockwise to adjust the output voltage to the desired level.
- Repeat the process for each output socket to set the desired voltage levels.
Connecting Devices Safely
To ensure safe operation of the SVR-2000VA Voltage Stabilizer, follow these guidelines:
- Check Device Compatibility: Ensure that the devices you plan to connect are compatible with the stabilizer's output voltage range.
- Use Appropriate Cables: Use cables with appropriate gauge and insulation to prevent overheating and electrical hazards.
- Monitor Voltage Levels: Regularly monitor the voltage levels on the display screen to ensure optimal performance.
Time Delay AVR Device: Enhancing Efficiency
The SVR-2000VA Voltage Stabilizer features a time delay function that enhances its efficiency and prolongs the lifespan of connected devices.
What is Time Delay in an AVR?
Time delay refers to the period between the detection of a voltage fluctuation and the activation of the stabilizer's regulation mechanism. This feature allows the stabilizer to avoid unnecessary regulation cycles, reducing wear and tear on the internal components.
Advantages of Time Delay Functionality
The time delay function offers several advantages:
- Reduced Wear and Tear: By minimizing unnecessary regulation cycles, the time delay function prolongs the lifespan of the stabilizer and connected devices.
- Improved Efficiency: The time delay function allows the stabilizer to operate more efficiently, reducing energy consumption and lowering operating costs.
Best Practices for Time Delay Configuration
To configure the time delay function, follow these steps:
- Locate the time delay adjustment knob on the front panel of the stabilizer.
- Rotate the knob clockwise or counterclockwise to adjust the time delay period to the desired level.
- Monitor the performance of the stabilizer and connected devices to ensure optimal operation.

Blockbuster.ph
Review
You May Also Like

Prism 4RS ARGB CPU Case Fan 120mm Infinity Mirror Design 5V 3PIN Motherboard Lighting Sync 4PIN PWM 800-1800RPM Case Cooler Fan

CROWMSTAR 12V 1.5A UPS Battery Backup for WiFi Router Modem and CCTV Camera Power Supply

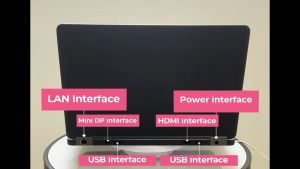
17.3" 240Hz Laptop LCD Screen NE173QHM NZ1 NE173QHM-NZ1 NE173QHM-NZ2 NE173QHM-NZ3 NE173QHM-NZ5 Display Matrix Panel eDP 40 Pins
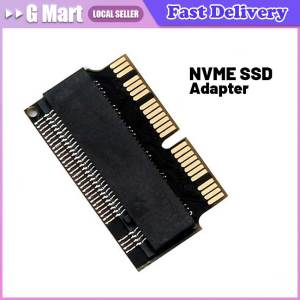
👍【Local Warehouse】SSD Adapter M2 To SSD for Macbook Air 2013 2014 2015 2017 M.2 MKey PCIe X4 NGFF To SSD for Apple Laptop
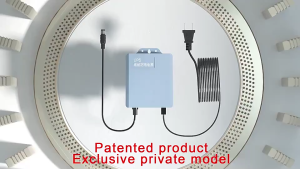
V380 PRO X AVIDUS 12V 1.5A Mini UPS Built-in Battery Supply For WiFi Modem Router and Outdoor CCTV Uninterruptible Power Supply Extension Cord Working System IP Camera Can Also Be Use For 12V 2A Devices
4Pin Male to Male 3D Printer Auto Feed BMCU Printer Multiple Color Module Transmission Connection Cable 50cm/100cm

Laptop Sleeve Case Thin Computer Carrying Bag Laptop Case Small/Large Computer Bag Cover with Handle Laptop Sleeve Bag

PC Tech Laptop LED Screen 15.6 inch Standard 40 Pins 1366 x 768 HD LCD Laptop Screen DELL B156XW02 V.6 fit B156XW02 V.7 B156XTN02 CLAA156WB11A Laptop Case For 15.6 - Lazada
![[Chinatera Brand Store]High Speed Desktop Air Compressor 12cm 4 Pin Large Air Volume PC Case Radiator for Cooling and Ventilation](https://img.lazcdn.com/g/ff/kf/Sd837ea36b1134d588585b096b55d7811w.jpg_300x300q80.jpg)
[Chinatera Brand Store]High Speed Desktop Air Compressor 12cm 4 Pin Large Air Volume PC Case Radiator for Cooling and Ventilation

PC ARGB Lighting Controller 5V 3Pin Satas Adapters Builts in Mode Selector Pwms Speed Control Magnetic Installation

Circuitrocks Woven Conductive Fabric - Silver 20cm square