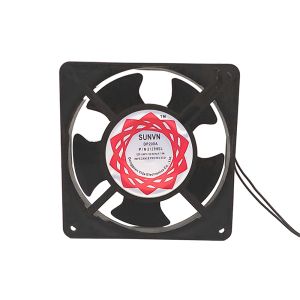
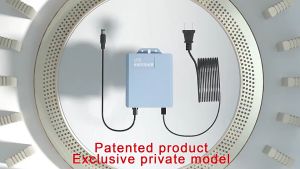
220V Incubator Blower Fan Automatic Circulation Cooling Fan Ventilation Exhaust Fan for Egg Incubator Parts and Accessories
220V Incubator Blower Fan Automatic Circulation Cooling Fan Ventilation Exhaust Fan for Egg Incubator Parts and Accessories
Introduction to Egg Incubator Parts
An egg incubator is a crucial piece of equipment for those involved in poultry farming, hatching eggs, or conducting research related to avian species. Among the various components of an egg incubator, proper ventilation plays a vital role in ensuring successful hatching. This article will focus on the importance of ventilation, specifically discussing the 220V incubator blower fan and automatic circulation cooling fan.
Understanding the Importance of Proper Ventilation
Proper ventilation is essential for maintaining optimal conditions inside an egg incubator. It helps regulate temperature, humidity, and air quality, which are critical factors for successful hatching. A well-designed ventilation system ensures that fresh air is continuously supplied while removing excess heat, moisture, and carbon dioxide. In this context, the 220V incubator blower fan and automatic circulation cooling fan are indispensable components.
Key Components of an Incubator
An egg incubator consists of several key components, including the heating element, thermostat, humidifier, and, of course, the ventilation system. The ventilation system comprises the blower fan and cooling fan, both of which work together to maintain ideal conditions inside the incubator.
Selecting the Right Blower Fan
Choosing the right blower fan for your incubator is crucial for ensuring optimal performance. Here are some factors to consider when selecting a blower fan:
- Compatibility: Ensure that the blower fan is compatible with your specific incubator model.
- Capacity: Choose a blower fan with sufficient capacity to handle the volume of air required for your incubator.
- Noise Level: Opt for a blower fan with a low noise level to avoid disturbing the eggs during the incubation process.
Identifying the Best Blower Fan for Your Incubator
When searching for the best blower fan for your incubator, it's essential to consider the factors mentioned above. Some popular options include the 220V incubator blower fan, which is known for its reliable performance and energy efficiency.
Comparing Different Blower Fan Models
To help you make an informed decision, here's a comparison of different blower fan models available in the market:
| Model | Capacity | Noise Level | Price | |-------|----------|-------------|-------| | 220V Incubator Blower Fan | High | Low | Moderate | | XYZ Blower Fan | Medium | Medium | Low | | ABC Blower Fan | Low | High | High |
Installing the Automatic Circulation Cooling Fan
Once you've selected the appropriate blower fan for your incubator, the next step is to install the automatic circulation cooling fan. Follow these steps to ensure a smooth installation process:
- Turn off the power supply to the incubator.
- Locate the designated area for the cooling fan within the incubator.
- Carefully remove any existing fan, if applicable.
- Attach the new cooling fan to the designated area using the provided mounting hardware.
- Connect the wiring according to the manufacturer's instructions.
- Test the cooling fan by turning on the power supply and checking for proper operation.
Troubleshooting Common Installation Issues
If you encounter any issues during the installation process, refer to the troubleshooting guide below:
- Fan Not Operating: Check the power supply and wiring connections.
- Excessive Noise: Verify that the fan is securely mounted and not obstructed.
- Inadequate Airflow: Inspect the fan blades for damage or blockages.
Maintaining Your Incubator Blower Fan
Regular maintenance is essential for ensuring the longevity and optimal performance of your incubator blower fan. Follow these tips to keep your blower fan in top condition:
- Clean the Fan Blades: Remove any dust or debris from the fan blades using a soft brush or cloth.
- Check Wiring Connections: Inspect the wiring connections for signs of wear or damage.
- Lubricate Moving Parts: Apply a small amount of lubricant to moving parts, such as bearings or gears.
Regular Maintenance Tips
To maintain your incubator blower fan, adhere to the following schedule:
- Clean the fan blades every 3 months.
- Check wiring connections every 6 months.
- Lubricate moving parts annually.
Cleaning and Replacing Parts
Cleaning and replacing parts is an integral part of maintaining your incubator blower fan. Refer to the manufacturer's guidelines for specific instructions on cleaning and replacing parts.
Conclusion
The 220V incubator blower fan and automatic circulation cooling fan are essential components of an egg incubator, playing a significant role in maintaining optimal conditions for successful hatching. By understanding the importance of proper ventilation, selecting the right blower fan, installing the cooling fan correctly, and performing regular maintenance, you can ensure the best possible outcome for your egg incubation process.

MOKETA MALL
Review

You May Also Like
Circuitrocks Accelerometer 3-Axis Digital ADXL346
for DC Air Turbo Blower Fan 75x75x30mm 12V 7cm 7530 Centrifugal Radiators Air Flow Cooling Cooler Fan for 3D Printer BBQ

Genuine Intel X550-T2 2xRJ45 Dual Port 10Gbe 10G 10Gbps Converged Network Adapter for Server PC with SFF Bracket (PCIEx8)
Brother Printer Power Supply J100 J125 T300 T500 T700 T310 T510 T710w. Refurbished
High Current 80V 50A Diode Module Power Supply Industrial Ideal Diode Module Solar Controller Low Power
Secure 500W 220V Automatic Voltage Regulator: Overload Protection Power Supply for PC

12x12cm Incubator fan AC 220V Cooling fan Heavy duty Exhaust Blower fan for DIY Incubator parts set
Common Ground Design Reverse Polarity Protections Module 3-30V 4A Output Ideal Diode PCBs For Systems
V380 Pro Uninterruptible Power Supply Extension cord 12V 1.5A Mini UPS Battery Backup Outdoor CCTV Built-in Battery Working System IP Camera Power Cord For Wifi modem
POS Hardware Package for any business with free POS app

Shockproof TPU Shell Guard Enclosure For Claw 8 AI+ Handheld Gaming System Provides Impact Resistance For All Functions