Garden Pavement Mold & DIY Paving Cement Brick: A Comprehensive Guide
Garden Pavement Mold & DIY Paving Cement Brick: A Comprehensive Guide
Introduction to Garden Pavement Mold
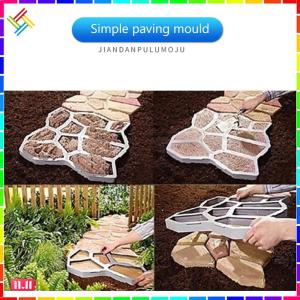
Garden pavement molds are essential tools for creating custom paving bricks and stones for your garden pathways. These molds come in various shapes, sizes, and materials, making it easy to personalize your outdoor space. A garden pavement mold allows you to make DIY paving cement bricks that can be used to build beautiful, durable paths and walkways.
What is a Garden Pavement Mold?
A garden pavement mold is a reusable form that helps you create uniform paving bricks and stones using concrete, mortar, or other construction materials. These molds come in different styles, including square, rectangular, and round shapes, allowing you to choose the best fit for your project.
How to Choose the Right Garden Pavement Mold
When selecting a garden pavement mold, consider the size and shape of the paving bricks you want to create. Additionally, pay attention to the mold's material, durability, and ease of use. Some popular options include aluminum, plastic, and silicone molds. Make sure to choose a mold that suits your needs and budget.
DIY Paving Cement Brick Making Process
Creating your own paving cement bricks is a rewarding DIY project that can enhance the beauty and functionality of your garden. Here's a step-by-step guide to help you get started.
Materials Needed for DIY Paving Cement Brick
To make paving cement bricks, you'll need the following materials:
- Garden pavement mold
- Portland cement
- Sand
- Gravel
- Water
- Mixing container
- Trowel
Step-by-Step Guide to Creating Your Own Paving Cement Bricks
- Mix the concrete: Combine the Portland cement, sand, and gravel in a mixing container. Add water gradually until you achieve a thick, workable consistency.
- Prepare the mold: Place the garden pavement mold on a flat surface, such as a concrete slab or a workbench.
- Pour the mixture: Carefully pour the concrete mixture into the mold, filling it to the top.
- Smooth the surface: Use a trowel to smooth the surface of the concrete, removing any air bubbles and excess material.
- Allow to cure: Let the concrete cure for at least 24 hours, or as specified by the manufacturer's instructions.
- Remove the mold: Once the concrete has cured, carefully remove the garden pavement mold to reveal your new paving cement brick.
Concrete Path Maker: An Overview
A concrete path maker is a specialized tool designed to help you build durable, attractive pathways in your garden. This tool simplifies the process of creating concrete paths, making it easier to achieve professional results.
Understanding the Benefits of Using a Concrete Path Maker
Using a concrete path maker offers several advantages, including:
- Consistent thickness and width
- Smooth, even surfaces
- Easy to use, even for beginners
- Faster construction time
- Customizable designs
How to Use a Concrete Path Maker for Your Garden
To use a concrete path maker, follow these steps:
- Plan your path: Determine the desired length, width, and location of your concrete path.
- Prepare the site: Clear the area of grass, debris, and any obstacles.
- Install the path maker: Position the concrete path maker along the planned path, ensuring it's level and straight.
- Pour the concrete: Fill the path maker with concrete, working from one end to the other.
- Smooth the surface: Use a trowel or screed to smooth the concrete, removing any air bubbles and excess material.
- Allow to cure: Let the concrete cure for at least 24 hours, or as specified by the manufacturer's instructions.
- Remove the path maker: Once the concrete has cured, carefully remove the concrete path maker to reveal your new garden pathway.
Stone Road Construction Tips
Building a stone road requires careful planning and execution to ensure a durable, attractive result. Here are some tips to help you get started:
Choosing the Right Stones for Your Path
Selecting the appropriate stones for your path depends on factors such as the intended use, climate, and aesthetic preferences. Popular options include:
- Flagstone
- Cobblestone
- Granite
- Slate
Laying the Foundation for a Durable Stone Road
A solid foundation is crucial for a long-lasting stone road. Follow these steps to lay the foundation:
- Excavate the area: Remove grass, debris, and any obstacles from the planned path.
- Compact the soil: Use a plate compactor to compress the soil, creating a stable base.
- Add a layer of gravel: Spread a layer of crushed gravel over the compacted soil, then compact it again.
- Install a geotextile fabric: Place a layer of geotextile fabric over the gravel to prevent weeds and maintain drainage.
- Add a layer of sand: Spread a layer of sand over the geotextile fabric, then compact it again.
Conclusion: Creating Your Perfect Garden Path
Creating a beautiful garden path using garden pavement molds, DIY paving cement bricks, concrete path makers, or stone road construction techniques can transform your outdoor space. By following these guidelines and tips, you'll be well on your way to building a durable, attractive path that enhances the beauty and functionality of your garden.
If you're looking for a reliable and versatile tool to help you create custom paving bricks and stones, consider investing in a garden pavement mold. With this guide, you'll have everything you need to start your DIY paving project today!

The World Market
Review

You May Also Like

【Original+24hours delivery】RS755 DC 12V Motor For Lawn Mower Cordless Grass Cutter Lawn Mower Grass Trimmer

Outdoor Balcony Metal Art Flower Pot Rack Hanging Fence Plant Holder Storage Shelf Chinese Style Metal Balcony Furniture

1 pack Dried Moss (Sphagnum Moss) Per Pack Good for plants hanging plants

Rechargeable Electric Mosquito Killer Swatter Racket
Polocat 1/4" Watering Hose Drip Pipe 4/7mm Gardening Micro Irrigation System Black Garden Watering System For Greenhouses10M/20M/30M

Original & High-Quality Telescopic Fruit Picker with High Pruning Branch Saw & Portable Tree Cutter Head Basket

Pressure Washer Aluminum Foam Cannon Foam Generator Snow Foam Lance with 1/4” Quick Connector for Portland Husky Ryobi Greenwork

Greenfield Gasoline Generator 3100W Electric Start

University Woolen Triangle Flag School Classroom World Famous School Gift Outdoor Atmosphere Hanging Banner
Premium Lawn Mower Clutch System Fits KM131R BT131 HT132 Garden Models Lawn Clutch Replacement Part

CHERRY TOMATO SEEDS (30PCS SEEDS) - HYBRID/CHERRY RED VARIETY/EASY TO GROW/HIGH YIELDING