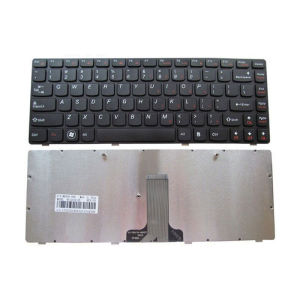
Laptop Keyboard Replacement for LENOVO G480 G485 G400 G405 G410 G490 Z480 Z485
Laptop Keyboard Replacement for LENOVO G480 G485 G400 G405 G410 G490 Z480 Z485
Understanding the Need for Laptop Keyboard Replacement
Identifying Common Issues with Laptops
Over time, laptop keyboards can wear out due to frequent use, accidental spills, or mechanical failures. This can lead to various issues such as sticky keys, missing characters, or even complete keyboard failure. These problems can hinder your productivity and make using your laptop a frustrating experience.
Determining When to Replace Your Keyboard
If you notice any of the following issues, it may be time to replace your keyboard:
- Sticky or unresponsive keys
- Missing characters while typing
- Unusual noises when pressing keys
- Physical damage to the keyboard
Finding the Right Laptop Keyboard Accessories
Choosing Compatible G480 G485 G400 G405 G410 G490 Keyboard Accessories
When selecting a new keyboard for your Lenovo laptop, it's essential to ensure compatibility with your specific model. In this case, we're focusing on the LENOVO G480 G485 G400 G405 G410 G490 Z480 Z485 series. Make sure to choose a keyboard accessory that matches these models to avoid any compatibility issues.
Locating Reliable Sources for Lenovo Laptop Keyboard Parts
To find high-quality keyboard parts for your Lenovo laptop, consider purchasing from reputable online retailers like Amazon, eBay, or Newegg. Additionally, you can visit official Lenovo stores or authorized service centers for genuine replacement parts.
Steps to Replace Your Laptop Keyboard
Preparing for the Replacement Process
Before starting the replacement process, gather the necessary tools and materials, including a new keyboard, screwdrivers, and a flathead tool. It's also recommended to have a clean, well-lit workspace and sufficient time to complete the task.
Removing the Old Keyboard
Follow these steps to remove the old keyboard:
- Turn off your laptop and disconnect all power sources.
- Remove the screws securing the bottom cover of your laptop.
- Carefully lift the bottom cover to expose the internal components.
- Locate the keyboard ribbon cable and gently disconnect it from the motherboard.
- Remove the screws holding the keyboard in place.
- Lift the old keyboard out of the laptop.
Installing the New Keyboard
Once the old keyboard is removed, follow these steps to install the new one:
- Align the new keyboard with the existing mounting points.
- Secure the new keyboard using the screws removed earlier.
- Connect the keyboard ribbon cable to the motherboard.
- Reattach the bottom cover and secure it with screws.
- Power on your laptop and test the new keyboard.
Ensuring Optimal Performance After Replacement
Testing Your New Keyboard
After replacing the keyboard, it's crucial to test its functionality thoroughly. Check for any issues such as missing characters, unresponsive keys, or unusual noises. If you encounter any problems, consult the manufacturer's instructions or seek professional help.
Adjusting Settings for Better User Experience
To optimize your new keyboard's performance, consider adjusting the settings in your operating system. This may include enabling or disabling certain features, changing keyboard shortcuts, or customizing the keyboard layout.
Additional Tips and Resources
Maintaining Your New Keyboard
To keep your new keyboard in top condition, follow these maintenance tips:
- Clean the keyboard regularly using compressed air or a soft cloth.
- Avoid eating or drinking near your laptop to prevent spills.
- Store your laptop in a cool, dry place when not in use.
Seeking Help and Support
If you encounter any issues during the replacement process or need further assistance, don't hesitate to reach out to Lenovo's customer support or consult online forums and communities dedicated to laptop repairs.

YSD2021
Review
You May Also Like

Io.1.1 Transparent and Diaphanous Wheel Ie3.0 Wired Wireless New Mouse Wheel

TECNO SPARK GO 2024 2023 2022 Tempered Glass FSHANG Full Glue Screen Protector

Nubia Red Magic Mini Charger 65W/45W/35W Deuterium Peak Energy Block with Data Cable

Applicable to Oppofindx6 Phone Case New Oppo Drop-Resistant Findx6pro Liquid Silicone Findx6por Creative Shell Internet Hot Fashion Brand Premium Limited Edition All-Inclusive Ultra-Thin Protective Case
【Free Shipping】 Adhesive Cable Tray Basket Metal Organizer for Power Strip and Electronic Cable Storage

RJ45 CAT6 Waterproof Connector M20 IP68 Cat6 8P8C Ethernet LAN Cable Coupler Female to Male Outdoor Networking Adapter
Vertical Laptop Stand Dual-Slot Adjustable laptop organizer Universal PVC standLaptop Holder

Vivo V40 5G Case Vivo V40 Pro 5G High-quality Retro Ins Sketch Three-dimensional Camellia Anti-drop Strap Lens Protection Metal Frame Phone Case

Washing Machine Mobile Base Automatic Bracket Pad Universal Wheel Pulley With Brake Adjustable Base

Ultra-Thin Metal Invisible Foldable Stand for Huawei Mate70/Pro+ Phone Case Magnetic Absorption Heat Dissipation Breathable Pura70Pro Anti-Fall Protection
Huawei P40 Privacy Screen Protector Anti Blue Light Tempered Glass Black Edge Phone Sticker Full Screen Protection against Falling And Explosion